Showing posts with label directions. Show all posts

Monday, May 21, 2012

Bacon Swiss Individual Quiche

I've been in the mood for quiche lately, and I thought it would be nice to make individual quiches to make leftovers easier. It's been a while since I made a quiche, but after looking up several recipes, I decided to just wing it. Most of the recipes were fairly similar, and I've never liked having to be too exact.

So if you've never made a quiche before, you're in luck: this is something you can't mess up.

Here's approximately what I used:
  • 7 eggs
  • 3/4 c milk
  • 1 c shredded Swiss
  • 2/3 c bacon bits
  • 1 t crushed garlic
  • handful of spinach
  • handful of other shredded cheeses (Parmesan mix from deli)
  • pepper to taste
  • 5 layers phyllo dough (remember, if you buy frozen phyllo, put it in the fridge 24 hours before you want to use it) *NOTE - this can also be done with puff pastry
  • 3 T Butter/melted
Pre-heat oven to 350 degrees F. I used 4 ceramic 1 3/4 cup Corelle casserole dishes.

First I sauteed the spinach until wilted, the set it aside to cool. Then I mixed the eggs, milk, Swiss, bacon, garlic, other cheese, and pepper together and set it aside.

I took out 5 layers of phyllo dough and cut into 4 equal squares. I took the first section and brushed a little bit of butter between each of the five layers, which I then put into one of the casserole dishes. I set aside and repeated with the other 3 dishes.

I put the four phyllo dishes into the oven and baked for 5 minutes, then removed the dishes.

I mixed the spinach in with the egg mixture and poured a little under one cup of the mixture into each dish, placing them back into the oven for approximately 25 minutes.

When a knife inserted into the center comes out clean, they're done.


I thought they came out excellent! There was a very strong bacon flavor, and just enough spinach for my taste. Some people may prefer more. I didn't add any salt because the bacon was pretty salty already, but others may want to add salt or Tabasco for additional flavor.

 I might try to be a little more careful with the edges of the phyllo next time. Taking the dishes in and out of the oven so much made a lot of the edges break off and fall into the bottom of the oven and all over the stove and made a mess.

Have you ever made quiche before? Do you use a real recipe, or just add whatever sounds good?

Monday, April 30, 2012

How To Fold A Paper Cup

Paper cups are pretty handy, I've found, even as an adult. You just never know when you're going to need to carry water and not have a glass nearby. :) I learned the technique as a kid for practical purposes at camp one summer. I think the original theory was that it could be made out of a large piece of bark, but I could be making that part up. ;) Nowadays, I've found that regular printer paper works really well for this.

A year or so ago I taught a few teenagers the trick, and it was like a light bulb just came on. I had to send one kid out to the water fountain to prove it worked, and when he came back, everyone else crowded around to inspect. Did it really work? Was it leaking? And then he drank the water out of it! How cool! How handy! What other uses are there?

Scroll to the bottom to see a picture of my adorable dog and another use for paper cups. :)

Most paper is not square, so start by folding the paper into a square.

See the extra paper? Cut it off. Or leave it, if you want. Sometimes I just fold and tuck it in.

Now it's gone! If I don't have scissors, I just fold the extra bit a few times and tear it off.

Now take one corner to touch the opposite side.


Turn the paper over and repeat.

Fold the top triangle down. I like to tuck it into the handy slot, but you don't have to.


 Do the same to the opposite side.

And now you have your very own paper cup!


Try some water! My sample paper was a lighter scrapbook paper, and it didn't hold up as well as computer paper does, perhaps because there's more surface area?


For the record, I never dress up my dog, but after I made the paper cup for the pictures, I couldn't resist trying a larger one. And isn't he cute? I made an extra big paper cup and then bribed him with a milk bone to hold still long enough to take the picture. See that intent stare? There's a dog cookie at the other end of that stare.


Monday, April 23, 2012

Tanka

A few weeks ago, I wrote a little bit about Haiku. Today I'd like to talk about an even older form of Japanese poetry, one that I think I might like even better than the haiku. :) Tanka are five line poems with a syllable pattern of 5, 7, 5, 7, 7. The examples below are off on the syllables because of the translation.

Tanka often have themes similar to haiku, such as nature, and it's interesting to note that there was an official government Office of Poetry which conducted tanka competitions, but I think what makes tanka so special is the way they were used in private. Tanka were revered as THE style of love poem. Young men spent a great deal of time constructing just the right words, and then had to decide just the right form of presentation. He may have tinted bamboo paper a pretty color or scattered the paper with tiny flecks of gold and silver foil before rolling it up with a pretty flower or twig.


It almost goes without saying that the words would have then been written in his most careful calligraphy. If the young lady in question responded to his poem with an encouraging tanka of her own, the relationship would proceed. An exchange of new, personal, and unique poems would be expected to be exchanged throughout the courtship.

Below are a few examples of tanka written by Ono Komachi, still a well-known poet today, although she was born in 834 AD (death date unknown). Read each poem several times to get the full meaning. While they may have been written at completely different times about the author's own experience, I read it as one fictional girl's experience with a young man (I find it interesting that she has initiated the poem exchange). Tanka, as with haiku, could be used as a way to write an entire book.


Notice how the first two or three lines often set up the poem with some kind of image while the last two lines describe some kind of reflection/metaphor on that image (the third line acts as a kind of bridge or turning point to connect the top two and bottom two).

Sent anonymously to a man who had passed in front of the screens of my room
Should the world of love
end in darkness,
without our glimpsing
that cloud-gap
where the moon's light fills the sky?

Sent to a man who seemed to have changed his mind
Since my heart placed me
on board your drifting ship,
not one day has passed
that I haven't been drenched
in cold waves.

Sent in a letter attached to a rice stalk with an empty seed husk 
How sad that I hope 
to see you even now,
after my life has emptied itself
like this stalk of grain
into the autumn wind.

What do you think?

Monday, April 9, 2012

Haiku

Everyone knows that a traditional Japanese haiku is based on the number of syllables over three lines (5, 7, 5), but did you also know that haiku almost always have some reference to nature? What I love about this is that it isn't just talking about nature for the sake of saying something is pretty, but to make some kind of observation. Because they are so short, they have to pack a punch. The shortness also means it's nice and easy to reread multiple times to really see beyond the words.

Here is an example by the famous Basho Matsuo (1644-1694):

Bush clover in blossom waves
Without spilling
A drop of dew.

However, that doesn't mean haiku have to be stuffy. Check out this one by Issa, who lived from 1763-1827:

Don't worry, spiders,
I keep house
Casually.

The syllables don't work out exactly because of the translation, but I find it comforting and a little bit hilarious that people across the world over 200 years ago had the same problem I have!

Friday, April 6, 2012

Auto Post = Genius!

I've been doing some blogging research about how many times a week to post (general consensus is anywhere between 1-3 times a week for the average blogger, depending on content) and times of day to post which reach the most people and get the most comments. This article by Megan O'Neill is from last year, but it gives great information, showing that more people read and comment in the morning, and that certain days of the week typically have higher views, etc.

Well, that's great, except I don't usually have time to write in the morning except on Saturdays! In fact, I typically write in the evenings and post when people are probably going to bed. I was thinking about this when I noticed a new thing in Blogger as I was typing up my last blog post. Under Post Settings, there's a Schedule! I can use that to write a post on Saturday and have it auto publish on Monday! Wow! Here's a link to some directions, if you'd like.

I'm going to try to write several posts over the weekend when I have more time and then auto post two or three new posts next week. In fact, I'll auto post this!

Have you tried this before? If you blog, how many posts do you typically write a week/month? Do you find certain days of the week work better for you?

Sunday, April 1, 2012

Palm Folding

Folded Palm Crosses
In honor of Palm Sunday, I thought I'd share a few links I found on how to fold palms into crosses and other designs!

Here's one on Squidoo with a video and lots of links.

Here's a Wiki-How with pictures.

Here's an Origami site with links to diagrams.

Folded Palm Cross
I know I'm a very visual learner, so if I can see something done, I can often recreate it. These three sites give you three different ways to see how folding palms can be done, so hopefully however you learn, there's something helpful for you here!

The pictures here are two that I folded this morning. As you can tell from the top picture, the first one wasn't that great, but each subsequent one was better than the last.

Friday, March 2, 2012

Cake Decorating!

One of the things I loved best about my birthday growing up was that my mom would make a cake and decorate it with whatever colors and designs I wanted. When I was in college, I often paid it forward by making cakes for my roommates and friends. I haven't had an opportunity come up for a while lately, but I asked a friend recently if she'd like me to bake her a cake for her birthday. It would be a good chance for me to dust off my skills, although I've never been as good as my mom is.


I have these neat fire-proof things I soak and then wrap around my cake pans. I have no idea what they're called, but they work great to keep my cakes from rising unevenly!


Once the cakes are cool, it's time to layer! I like to put the bottom layer upside down and the top layer right side up, so that the two bottoms are together. It helps the cakes not rock unevenly. I usually use store-bought frosting for the filling. 


Now to cover the entire thing in white! I make my own frosting for the decorating part, using my mom's recipe, of course, because you can't really shape store-bought frosting. The kind I make will stiffen up when left out, which I personally like. If you don't like the outside to get a little hard, you can try to cover it quickly, but I think it will still get a bit of a shell.


Finally for some color! This cake is only one box of store-bought mix, so it's not very big. You can also see that I'm not great with measuring out how much space I need for my letters! Ideally, I'd have used several colors and added some flowers and leaves and such. I only had room for some scallops on top and bottom, though. The great thing about the few decorations there are, though, is that I can cover up some of my more minor mistakes! Next time, maybe I'll just write the name so there's more room.

Do any of you decorate your own cakes? How did you learn (by watching someone or taking a class)? What's your favorite frosting to use to decorate?

Tuesday, July 12, 2011

Creating an Ad in Picasa

I have decided I need to be more proactive in my life! That's right, I'm talking about advertisement. This post won't cover the where's, when's, or why's, but it will show you how to make your very own "button" ad using Picasa3. I won't cover adding HTML in this blog post, but I will show you how to create a basic design. In most cases, I've simply sent the resulting jpg to the blog writers, who have then created the link to my Etsy site themselves.

*I am using an Apple computer. Directions for a PC are probably the same or similar. I am not a Picasa expert, and there may be other ways to do this, but this has worked for me. Despite all the directions, it is very easy.

1. When you first open Picasa, it makes things easier if you have a
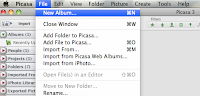
general idea of what you want for your background. I created a new album (File>New Album) and called it Ad Photos. I then searched through all my pictures and picked a few that might work as the background for an ad. In a few cases, I made a copy of the photo, modified the color to b&w or sepia, and then dragged the modified photo to my new album.
The picture will remain in it's original location, also.


2. On t
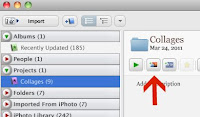
he left hand side is the menu. Mine says Albums, People, Projects, Folders, Imported from iPhoto, etc. Go to Projects>Collages>Create a Photo Collage (Create a Photo Collage should be next to the green arrow).


3. You will automatically be in the Settings tab. Go to
Page Format>Add 
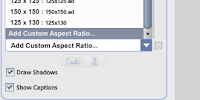
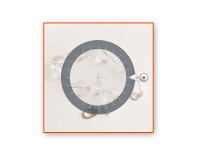
Custom Aspect Ratio. A box will pop up, and you can put in the pixels that you need for your ad. They are usually 150x150 or 250x125 or something to that effect. Most websites will have a page for advertisers that has a list of the different sizes they offer. Type in the size you need. This size will be remembered if you ever need it again. If you
want, though, you can name this the size it is.

4. Now go to the Clips tab. If you have created a collage before, there will be lots of pictures already. If you click on a picture and click Delete, it will go back to your Clips tab.


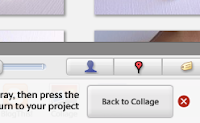
5. In the Clips tab, click Get More. This will take you back to your photo library. At the top of your left hand menu should be the Album you created and put different background pictures in. Choose one of the pictures, then click Back to Collage on the bottom right hand of your screen.


6. The image you chose is now in your Clips tab. Drag it over to the
big white space that will soon be your ad. Re-size the photo as needed so that no more white is showing, by pulling the little orange in or out. If you want to have 2 or 4 small pictures in this space, you can do that, too. If you want more then one photo, I recommend going back to your Settings tab. Right under the word Settings should be a pull down tab that starts with Picture Pile. If you scroll down and choose Mosaic or Grid, your photos will automatically re-size to fit the size you have.


7. When your background is appropriately sized, click Create
Collage.


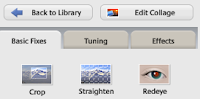
8. If you didn't make any changes to your background, you may do
so here, changing the exposure and color. If you want black & white, look under the Effects tab.


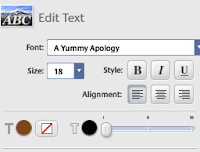
9. Under Basis Fixes>Text, you may add as many word boxes as
you want. You can change the color, size, and font.


10. When you are satisfied with the look of your ad, you will need to export it out of Picasa for it to become a jpg file. At the top of your screen, go to File>Export Picture to Folder and then choose
where in your computer you want it saved. I have a folder in Documents called Ads I dump everything into. I also name the picture what size it is, i.e. 150x150.


11. I attach the jpg image in an email and send it to whomever I'm sponsoring.

I hope this has been helpful for you. Please let me know if there are better ways to accomplish any of these steps! Here is a photo of one of my finished 250x125 ads:

Monday, August 2, 2010

Make your own pendant!

In my last post, I mentioned that I found some smooth sea worn stones when I went to the Pacific coast in Oregon. Well, I went to my local craft store to find some bails to glue to the back to make pendants, and I thought I'd share what I found!

To the right, you can see a piece of light green sea glass that my sister found (I'm so jealous!). I bought a traditional bail and glued it to the back using Bead Fix, which is a wonder-worker. (Side bar, I use Bead Fix in the place of Super Glue for
almost everything.)

This bail worked great. It glued on with no mess and has a large enough hole that a regular sized chain will comfortably fit through. However, the bail came in a package of one, and was more then I want to spend if I want, say ten or twenty bails.

Here's a solution I found:

They are technically called "dot dangles", but they looked enough like bails that I thought I would give them a try, since one package of 22 equaled about two of the official bail, though the dots are smaller. Here is the result on the left. The holes are a bit smaller, but I fixed that by adding jump rings, and you can't really tell.

Although the swirl pattern is prettier, I decided to use that as the adhesive side because I thought the glue would do better against it. I was pleased to see how strong it was.

Below you can see how the official bail on the glass and the dot dangle on the rock look from the front. About the same, I think!

Related Posts Plugin for WordPress, Blogger...